
Introduction
There’s something undeniably addictive about sweet and sour chicken wings. That perfect balance of tangy, sticky, and crispy is what makes them a favorite at restaurants and home kitchens alike. But here’s the thing—getting them just right can be tricky.
Have you ever made wings that turned out soggy instead of crispy? Or maybe the sauce didn’t have that signature punchy flavor? If so, you’re not alone. Many people struggle with achieving that crispy-on-the-outside, juicy-on-the-inside texture while ensuring the sauce is thick, glossy, and full of flavor.
The good news? You don’t need to be a professional chef to nail this recipe. The secret lies in five simple steps, which include proper preparation, seasoning, cooking methods, sauce-making, and tossing techniques. Follow these carefully, and you’ll be serving up restaurant-quality sweet and sour wings right from your kitchen.
Step 1: Prepping the Chicken Wings
Choosing the Best Chicken Wings
Not all wings are created equal. If you want crispy and flavorful results, start with high-quality chicken wings. You can either buy whole wings and cut them into drumettes and flats or purchase pre-cut wings for convenience.
So, which is better—fresh or frozen wings?
- Fresh wings tend to have better texture and moisture retention, making them ideal if you want ultra-juicy meat.
- Frozen wings can still work well, but they must be thoroughly thawed and patted dry before cooking to avoid excess moisture, which can lead to soggy skin.
Why Soak Chicken Wings in Water and Baking Soda?
You might have heard that soaking chicken wings before cooking helps improve texture. But why? The answer lies in baking soda.
Soaking wings in a solution of cold water and baking soda creates a chemical reaction that raises the pH level of the skin. This processbreaks down proteins and enhances browning, leading to crispier skin when cooked.
Balancing flavors isn’t just about seasoning—sometimes, it’s about how ingredients interact chemically. If you’re curious about how acidity affects proteins, check out our detailed post on why pineapple can break down cheese in unexpected ways: Does Pineapple Break Down Cheese?.
Here’s a simple guide for the soaking mixture:
| Ingredient | Quantity |
|---|---|
| Cold water | 4 cups |
| Baking soda | 1 tablespoon |
How to Soak Wings Properly:
- Fill a large bowl with cold water and stir in the baking soda until dissolved.
- Add the chicken wings and let them soak for 15-20 minutes.
- Drain and rinse the wings thoroughly under cold water.
- Pat them completely dry using paper towels.
Skipping this drying step is a mistake-excess moisture prevents crispiness. If the wings aren’t dry, you’ll end up with steamed wings instead of that crispy crunch everyone loves.
“If you want crispy wings, moisture is the enemy. The drier the wings, the crispier the result.”
Patting Dry for Maximum Crispiness
After soaking, patting the wings dry is non-negotiable. Even a small amount of leftover water can affect how well the wings crisp up during cooking. Use a clean kitchen towel or paper towels to remove every drop of moisture.
For extra crispiness, some chefs even let the wings air-dry in the fridge for 30 minutes to an hour before cooking. This helps tighten the skin and removes any remaining surface moisture.
Once your wings are dry and ready, it’s time to move on to seasoning and coating.
Step 2: Seasoning and Coating the Wings
Essential Spices for Flavorful Wings
The seasoning process is where the magic begins. While the sauce will add most of the flavor, the wings themselves need a solid base of seasoning to shine. A good dry seasoning mix ensures that every bite is packed with flavor.
Here’s a simple and effective spice mix to use:
| Spice | Amount | Purpose |
|---|---|---|
| Salt | 1 teaspoon | Enhances natural flavors |
| Garlic powder | 1 teaspoon | Adds savory depth |
| White pepper | ½ teaspoon | Provides mild heat |
| Paprika | 1 teaspoon | Boosts color and smokiness |
| Chili flakes (optional) | ½ teaspoon | For extra heat |
How to Season the Wings Properly:
- Place the dried wings in a large mixing bowl.
- Sprinkle the spice mix evenly over the wings.
- Toss the wings until fully coated.
The Secret Ingredient for Extra Crispy Wings
Want to know the real secret to ultra-crispy wings? Baking powder or cornstarch.
Both ingredients create a thin, crispy crust on the wings, helping to absorb moisture and promote browning.
- Baking powder raises the pH level, which accelerates crisping.
- Cornstarch forms a light, crunchy coating when fried or baked.
To use them:
- Add 1 tablespoon of baking powder or cornstarch to the dry seasoning mix before coating the wings.
- Toss until evenly distributed.
“A light dusting of cornstarch or baking powder is the game-changer for achieving that golden, crispy finish.”
Should You Marinate the Wings?
Marinating chicken wings before cooking can add extra moisture and flavor. However, when making crispy wings, it’s best to avoid liquid-heavy marinades before cooking. Instead, you can marinate the wings after they’re cooked by tossing them in the sauce.
For maximum crispiness:
- Use a dry seasoning rub before cooking.
- Toss wings in sauce only after they’re fully cooked.
- Now that the wings are seasoned and coated, it’s time for the most important part-cooking them to perfection.
Step 3: Cooking the Wings to Perfection
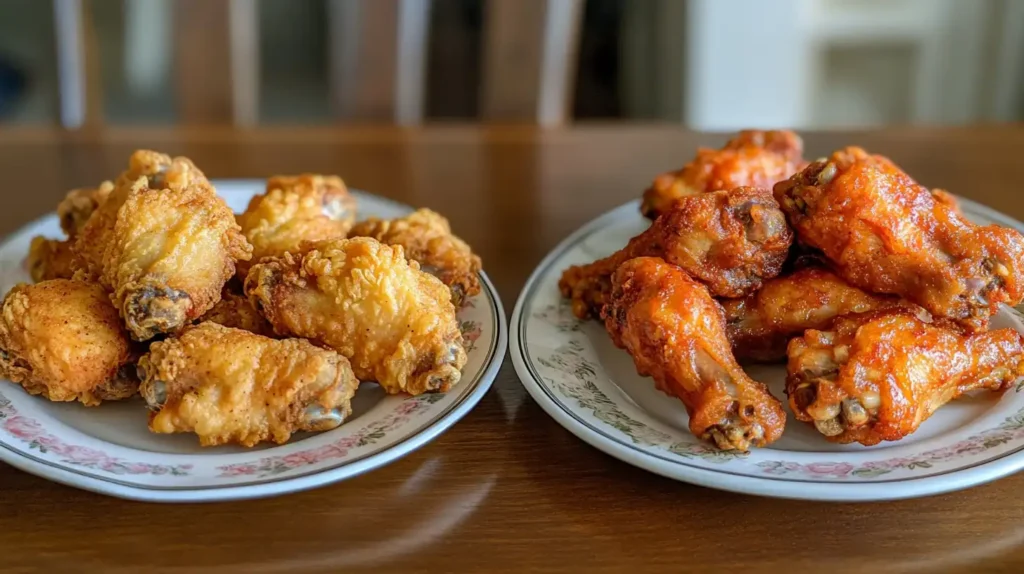
The cooking method is what makes or breaks the final result. The goal is crispy, golden-brown wings with juicy meat inside. There are three main ways to cook chicken wings: baking, air frying, or deep frying. Each method has its pros and cons, but the best one depends on your preference for crispiness and convenience.
Best Cooking Methods: Baking vs. Air Frying vs. Deep Frying
| Cooking Method | Pros | Cons |
|---|---|---|
| Baking | Healthier option, easy to do | Takes longer, requires high heat |
| Air Frying | Crispy results with little oil, fast cooking time | Can’t cook large batches at once |
| Deep Frying | Ultimate crispiness, fast cooking | Uses a lot of oil, higher in calories |
How to Bake Chicken Wings for Maximum Crispiness
Baking is the healthiest method while still delivering crispy skin if done correctly. The key is high heat and proper spacing.
Instructions for Baking:
- Preheat oven to 425°F( 218°C). High heat helps crisp the skin without drying out the meat.
- Line a baking sheet with foil and place a wire rack on top. This allows air to circulate around the wings for even cooking.
- Arrage wings in a single layer. Make sure they don’t touch—crowding leads to steaming instead of crisping.
- Bake for 20 minutes, then flip the wings. Bake for another 20–25 minutes until golden brown.
- For extra crispiness, broil for3-5 minutes at the end. Watch closely to prevent burning.
Air Frying: The Fast and Crispy Method
Air frying is perfect if you want crispy wings without deep frying. It requires minimal oil and delivers excellent results in half the time of baking.
Instructions for Air Frying:
- Preheat air fryer to 400°F (200°C)
- Lightly grease the air fryer basket with oil.
- Place wings in a single layer. Avoid overcrowding for even cooking.
- Air fry for 10 minutes, then flip. cook for another 10–12 minutes until crispy and golden brown.
Deep Frying: The Ultimate Crispy Wing Method
If you wan trestaurant-style crispiness, deep frying is the way to go. The key is maintaining the right oil temperature.
Instructions for Deep Frying:
- Heat oil to 350°F (175°C). Use vegetable or peanut oil for best results.
- Fry wings in batches for 8-10 minutes. Overcrowding lowers the oil temperature, leading to greasy wings.
- Remove and drain on paper towels. This prevents excess oil from making the wings soggy.
“If you’re after that ultra-crispy crunch, deep frying is unbeatable. But if you want a healthier option, air frying or baking still gives great results.”
Now that the wings are crispy and fully cooked, it’s time for the star of the dish-the sweet and sour sauce.
Step 4: Making the Sweet and Sour Sauce
The sauce is what gives sweet and sour wings their signature flavor. It should be thick , glossy, and perfectly balanced between sweet, tangy, and savory.
What is the Actual Flavor of Sweet and Sour Sauce?
Sweet and sour sauce combines two primary tastes: sweeetness and acidity. The goal is to balance these flavors so that one doesn’t overpower the other. The sweetness comes from sugar, while the tanginess comes from vinegar.
- Too sweet? Add more vinegar or soy sauce.
- Too tangy? Add a little extra sugar or honey.
For those who love the tangy contrast in sauces, understanding how different ingredients interact is essential. Discover how pineapple enhances both sweet and savory flavors in dishes by reading our comprehensive guide on cooking pineapple.
Key Ingredients for the Perfect Sweet and Sour Sauce
| Ingredient | Purpose |
|---|---|
| Ketchup | Adds sweetness and depth |
| Vinegar | Provides tanginess |
| Brown sugar | Enhances sweetness and caramelization |
| Pineapple juice | Adds fruity acidity |
| Soy sauce | Adds umami and saltiness |
| Cornstarch slurry | Thickens the sauce |
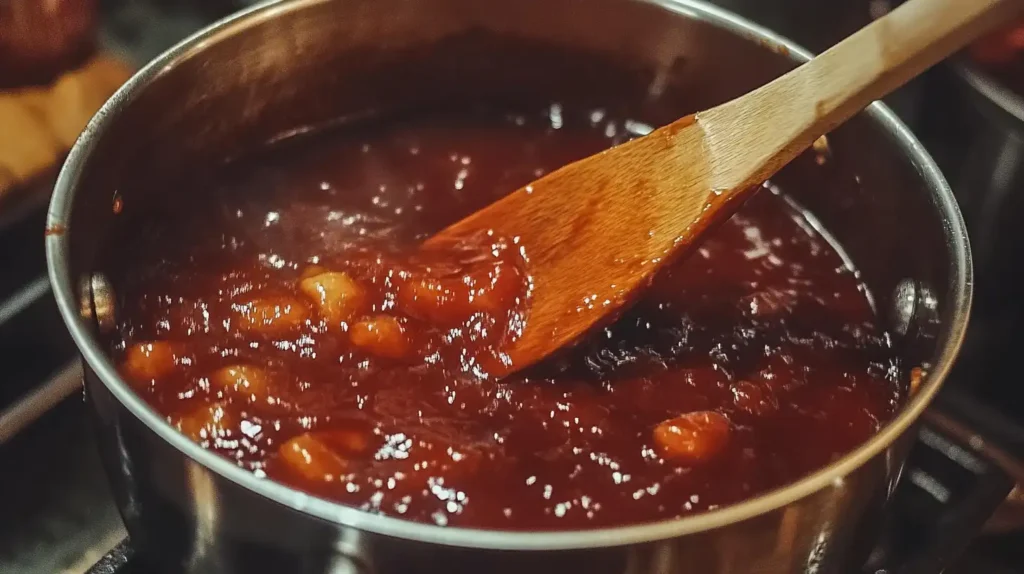
How to Cook the Sauce to the Right Consistency
- Heat 1 tablespoon of oil in a sauceopan over medium heat.
- Add 1/2 cup ketchup, 1/4 cup vinegar, 1/3 cup brown sugar, and 1/4 cup pineapple juice. Stir well.
- Simmer for 3-5 minutes until slightly thickened.
- Mix 1 tablespoon cornstarch with 2 tablespoons water. Slowly pour into the sauce while stirring.
- Cook until the sauce reaches a glossy, thick consistency.
“The perfect sweet and sour sauce should cling to the wings without being too thick or runny. It should be sticky, tangy, and full of flavor.”
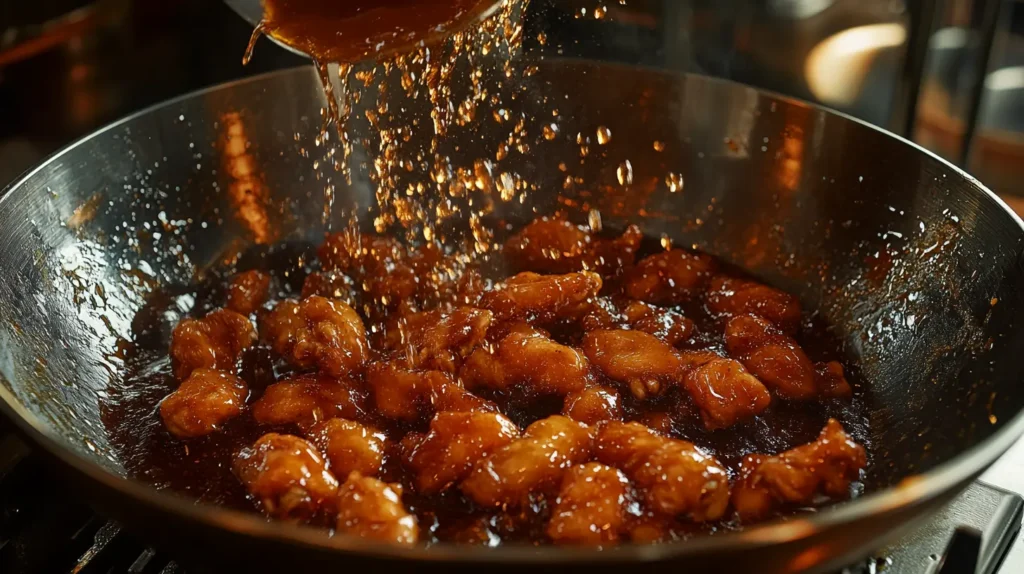
With the sauce ready, the final step is tossing the wings for that perfect glaze.
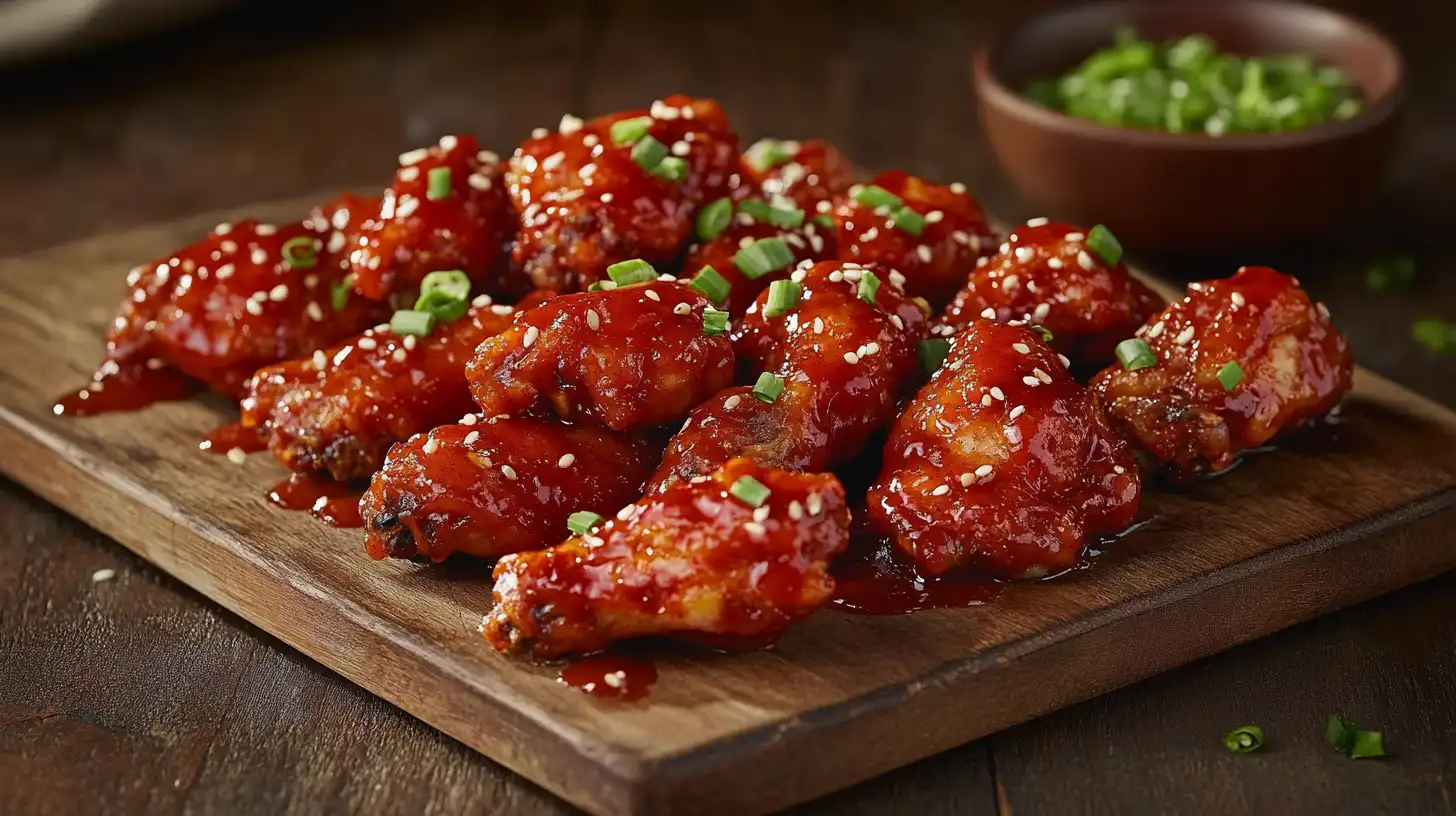
Step 5: Tossing and Serving the Wings
Do You Put Sauce on Wings Before or After Cooking?
Always toss wings in sauce after cooking. Adding sauce before cooking can make them soggy instead of crispy.
How to Toss Wings Properly:
- Place the cooked wings in a large mixing bowl.
- Pour warm sweet and sour sauce over the wings.
- Toss gently until every wing is evenly coated.
Garnishing for Extra Flavor
To enhance the presentation and taste, add these final touches:
- Sesame seeds – Adds a slight nutty crunch.
- Chopped green onions – Freshens up the dish.
- Crushed peanuts – Extra crunch for texture lovers.
Serving Suggestions
Sweet and sour wings are perfect on their own, but pairing them with the right sides can turn them into a complete meal.
| Side Dish | Why It Works |
|---|---|
| Steamed Jasmine Rice | Balances the tangy sauce |
| Garlic Fried Rice | Adds extra umami flavor |
| Asian Slaw | Fresh and crunchy contrast |
| Sweet Potato Fries | A fun, crispy alternative |
Once plated, your sweet and sour chicken wings are ready to enjoy. With the perfect balance of crispiness, stickness, and flavor, this dish is guaranteed to be a hit at any gathering.
Looking for the perfect side dish to complement your crispy wings? Pair them with a tropical twist, like a warm pineapple casserole, for a contrast of flavors: Try this Pineapple Casserole Recipe.
FAQ Section
Do you put sauce on wings before or after cooking?
Always after cooking. This keeps the wings crispy while ensuring they’re evenly coated in sauce.
Why soak chicken wings in water and baking soda?
Baking soda raises the pH level, breaking down proteins to create extra-crispy skin when cooked.
What is the actual flavor of sweet and sour sauce?
It’s a balance of sweet (sugar, pineapple juice) and tangy (vinegar, ketchup) flavors with a hint of umami.
What is the secret ingredient to crispy wings?
A combination of baking powder or cornstarch helps absorb moisture and creates a light, crispy crust.
For a filling side or second main dish, take a look at our Chicken and Pasta Crockpot Recipes – they’re just as easy and even more satisfying.
Conclusion
Mastering sweet and sour chicken wings comes down to proper preparation, cooking technique, and sauce balance. By following these five steps-prepping, seasoning, cooking, making the sauce, and tossing properly- you’ll achieve wings that are crispy, flavorful, and perfectly glazed every single time.
Now that you know the secrets, it’s time to put them to the test. Whether you’re making them for a party or a weekend meal, these wings will quickly become a household favorite.